Contents
Introduction
The fundamental assumption of background-foreground separation is that the foreground part moves/changes. This is not a depth estimation approach however. The concept might actually a bit outdated, even for batch devices, but there are a couple of applications where it is reasonable to use it. However, with increasing resolutions etc. it is important to select the correct compute platform (e.g. CPU, GPU, FPGAs etc.). OpenCv provices a couple of background subtraction algorithms (BGS). Let’s see how they perform on images of various sizes.
BGS Algorithms Available
OpenCV comes with a limited assortment of supported BGS algorithms:
CPU:
- plain frame difference with a threshold (needs to be implemented manually)
- MOG
- MOG2
- KNN
- CNT
- GSOC
- GMG
- LSBP
CUDA:
- plain frame difference with a threshold (needs to be implemented manually)
- MOG
- MOG2
- FGD (not used in comparision due to insufficient documentation; not available via the OpenCV Python API)
- GMG (not available via the OpenCV Python API)
Initializing the background subtractors looks like this:
//C++ CPU

#include <opencv2/opencv.hpp>
#include <opencv2/bgsegm.hpp>

cv::Ptr<cv::BackgroundSubtractor> mog;
mog = cv::bgsegm::createBackgroundSubtractorMOG();

cv::Ptr<cv::BackgroundSubtractor> mog2;
mog2 = cv::createBackgroundSubtractorMOG2();

cv::Ptr<cv::BackgroundSubtractor> gmg;
gmg = cv::bgsegm::createBackgroundSubtractorGMG();

cv::Ptr<cv::BackgroundSubtractor> knn;
knn = cv::createBackgroundSubtractorKNN();

cv::Ptr<cv::BackgroundSubtractor> cnt;
cnt = cv::bgsegm::createBackgroundSubtractorCNT();

cv::Ptr<cv::BackgroundSubtractor> gsoc;
gsoc = cv::bgsegm::createBackgroundSubtractorGSOC();

cv::Ptr<cv::BackgroundSubtractor> lsbp;
lsbp = cv::bgsegm::createBackgroundSubtractorLSBP();
// C++ - CUDA

#include <opencv2/cudabgsegm.hpp>
#include <opencv2/cudalegacy.hpp>

cv::Ptr<cv::BackgroundSubtractor> mog;
mog = cv::cuda::createBackgroundSubtractorMOG();

cv::Ptr<cv::BackgroundSubtractor> mog2;
mog2 = cv::cuda::createBackgroundSubtractorMOG2();

cv::Ptr<cv::BackgroundSubtractor> gmg;
gmg = cv::cuda::createBackgroundSubtractorGMG();
# Python - CPU

bgs_mog = cv2.bgsegm.createBackgroundSubtractorMOG()
bgs_mog2 = cv2.createBackgroundSubtractorMOG2()
bgs_knn = cv2.createBackgroundSubtractorKNN()
bgs_gmg = cv2.bgsegm.createBackgroundSubtractorGMG()
bgs_cnt = cv2.bgsegm.createBackgroundSubtractorCNT()
bgs_gsoc = cv2.bgsegm.createBackgroundSubtractorGSOC()
bgs_lsbp = cv2.bgsegm.createBackgroundSubtractorLSBP()
# Python - CUDA

bgs_mog = cv2.cuda.createBackgroundSubtractorMOG()
bgs_mog2 = cv2.cuda.createBackgroundSubtractorMOG2()
cuda_stream_0 = cv2.cuda_Stream()
cuda_stream_1 = cv2.cuda_Stream()
Running the CPU implementations the vtest.avi sample video yield the following results:
Similar to what is explained in section MOG, MOG2 and Frame Diff YouTube Video Comment, default values are used in the example comparison above. NB!: GMG requires 100 frames or so by default before it outputs something.
Benchmarking CPU and CUDA Implementations
Benchmarks are ran on this video by Panasonic Security (downloaded using yt-dlp) using various resolutions. Only the time to apply a BGS algorithm is measured. Latency introduce by host to device copies is considered to be neglectable.
CPU Performance
Using an Intel Core i7-1165G7 yields the following results:

Interestingly some algorithms (the simpler ones) seem to report faster results in Python than C++. I’m certain that my un-optimized memory management in C++ is to be blamed for it as I used a straight forward approach without really using neat things that are possible using C++. Automatic memory management of the OpenCV Python API wrapper might be much more careful on that than I was.
CUDA Performance
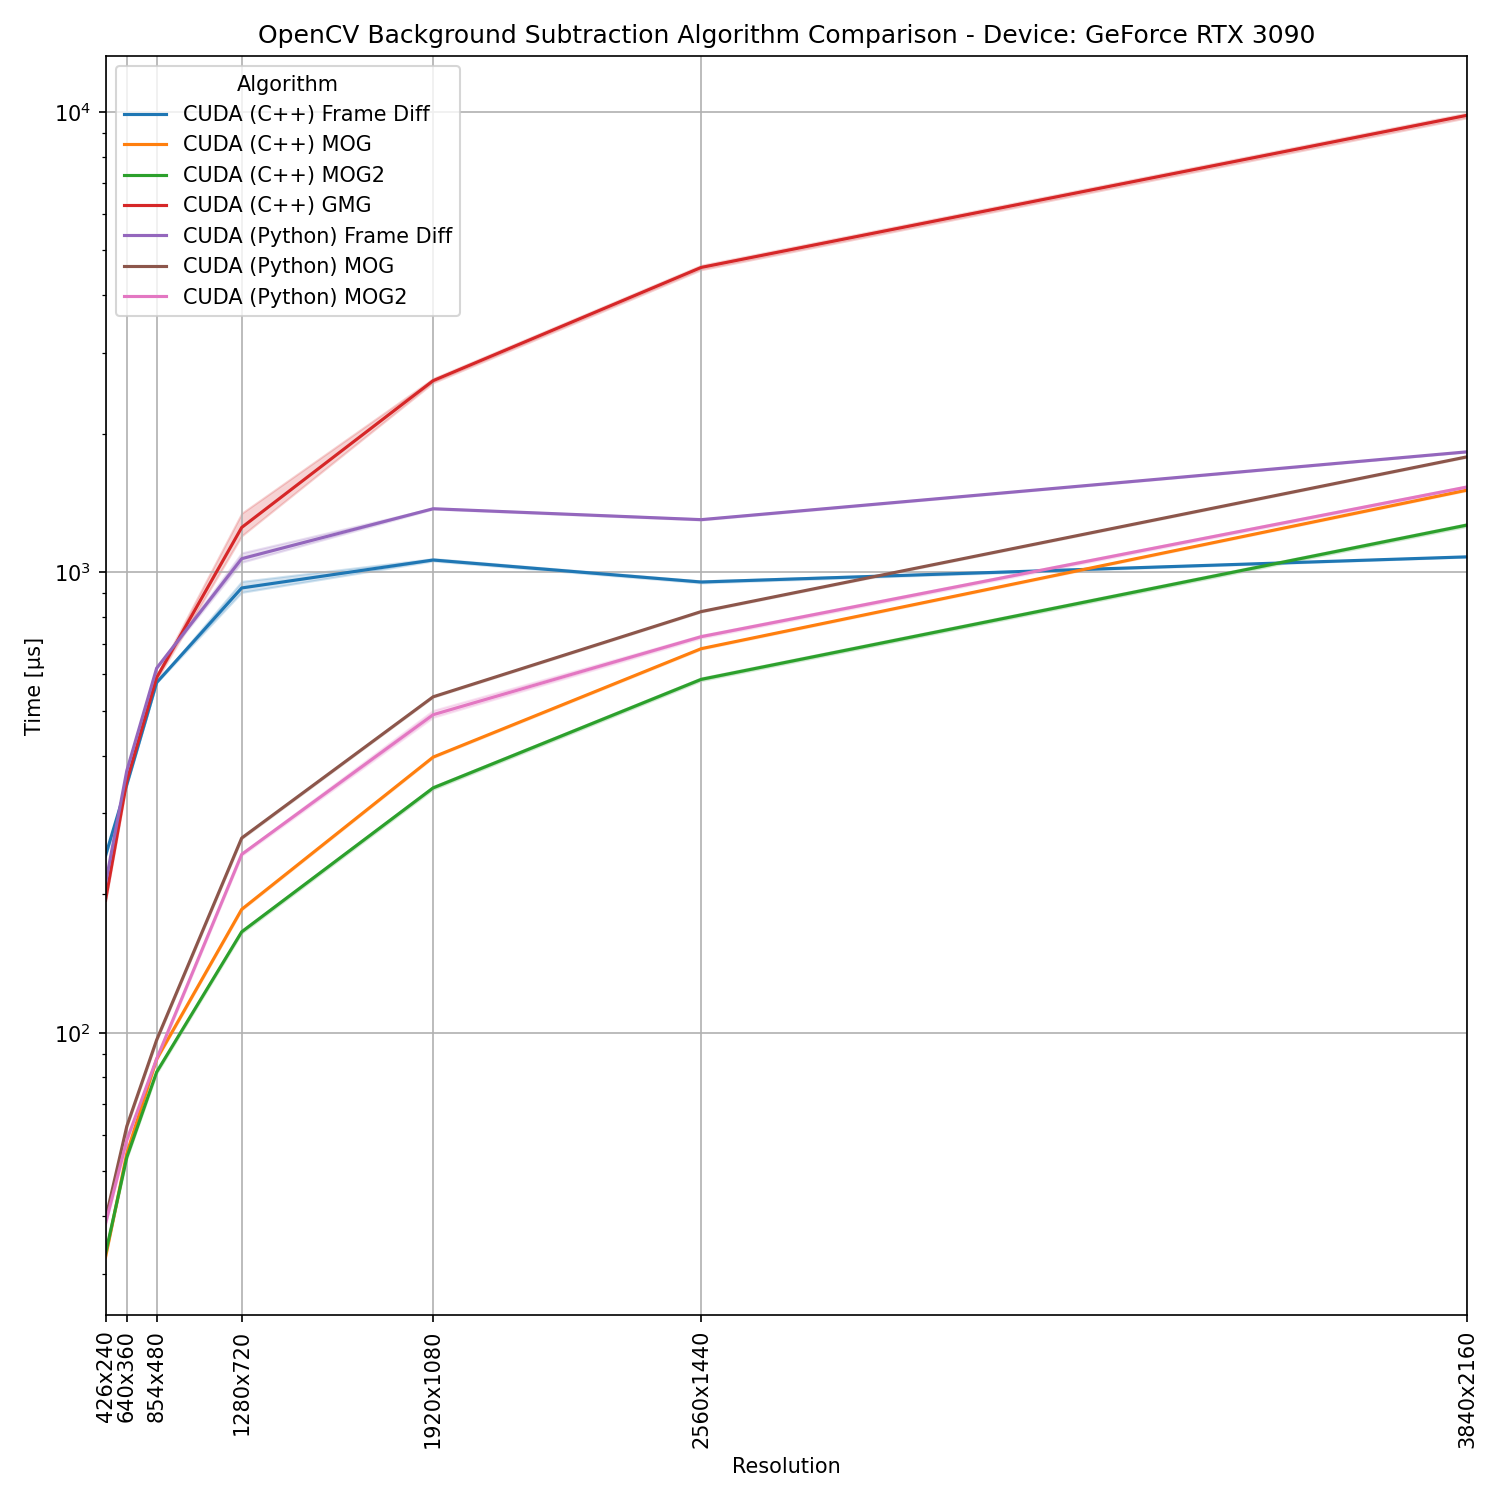
Using a NVIDIA RTX 3090 yields:

In this case there are no surprises that the C++ implementation is slower than using the Python API.
CPU vs. CUDA Comparison
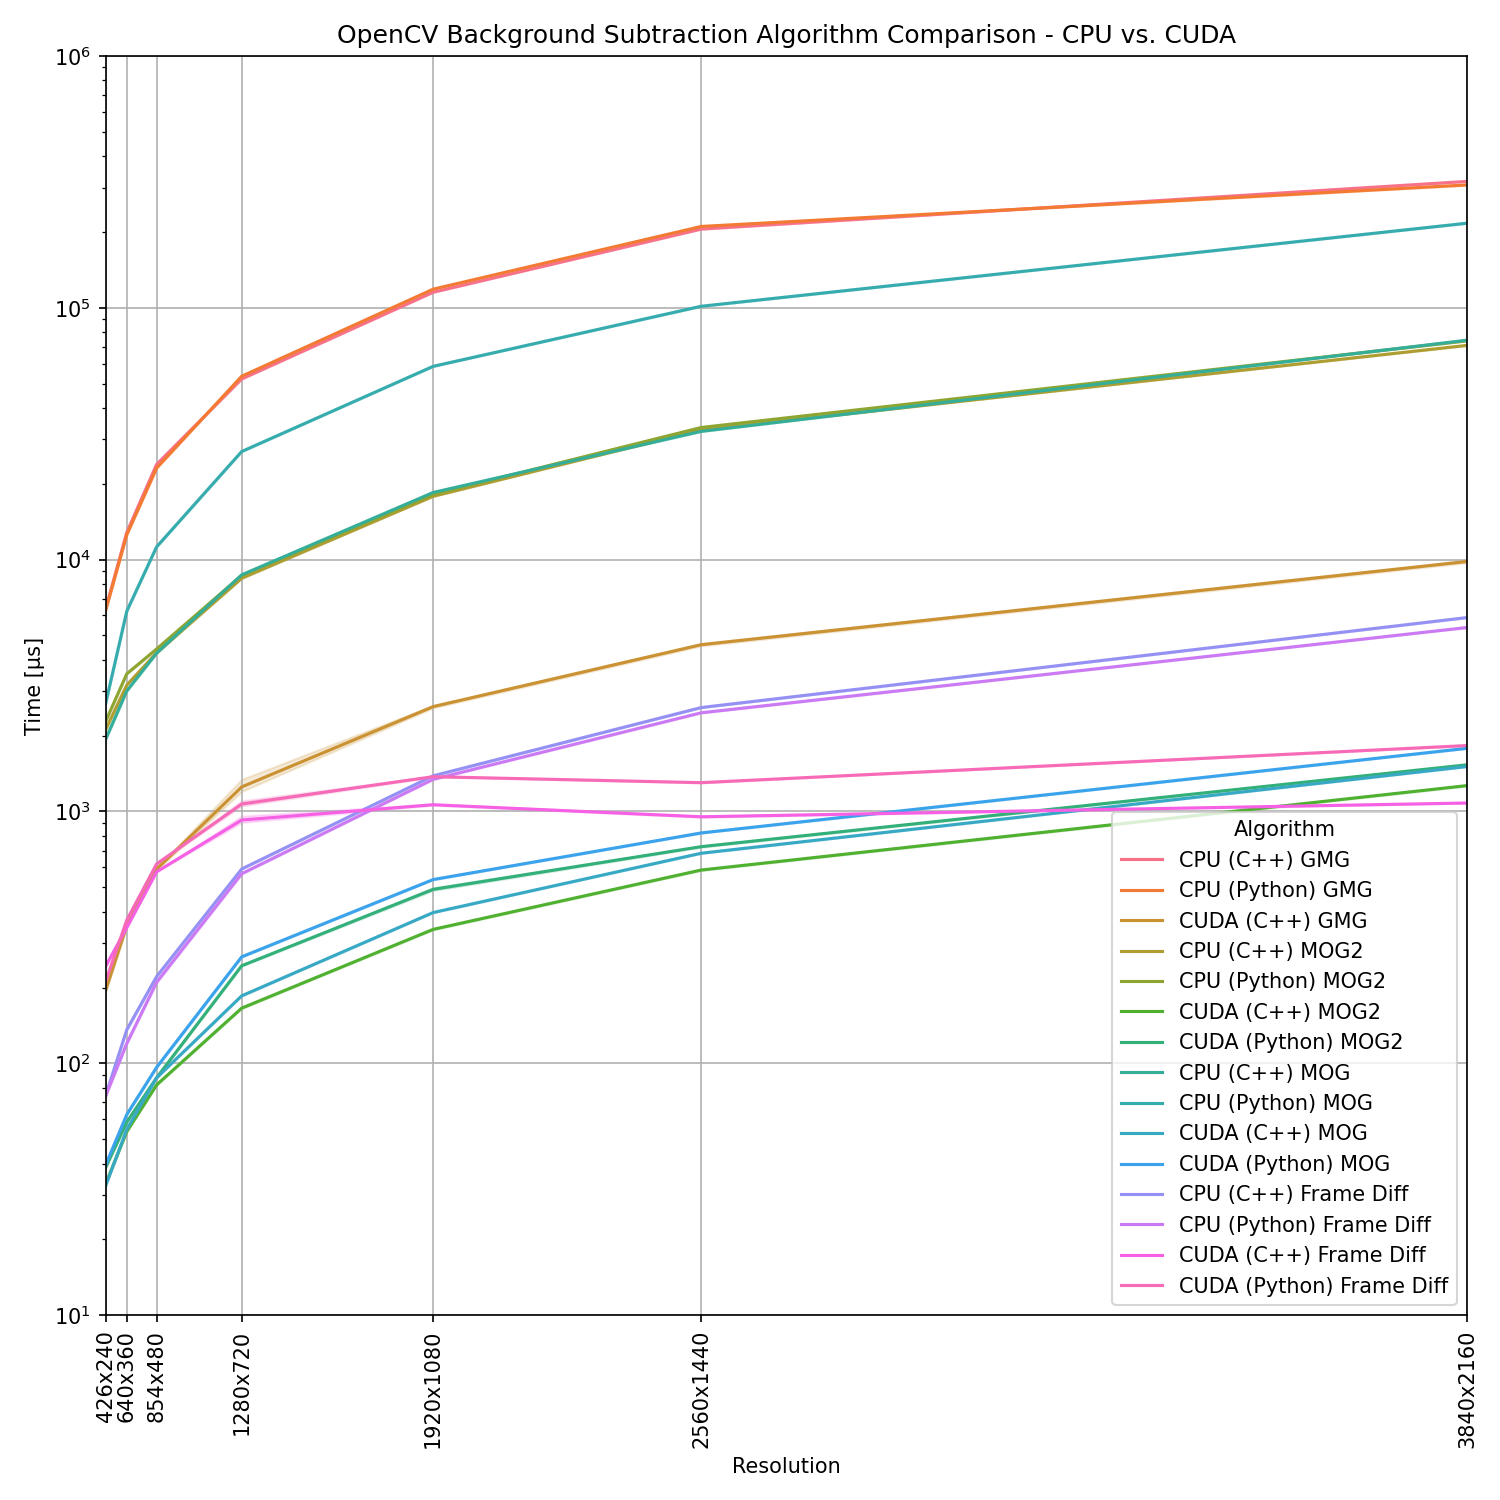
Since not all algorithms are available for both hardware platforms, we can compare a subset only. Further, I’m comparing the results obtained using the Intel Core i7-1165G7 againts the results obtained from a NVIDIA GeForce RTX 3090. The choice of CPU might not be exactly fair but using slower GPUs or faster CPUs still lead similar performance differences.


In general we observe a clear advantage of using GPUs that increases a lot with increasing image size.
Final words
There are may applications that used to be based on a background/foreground estimate approach are now replaced by deep learning based approaches. These can be proper end2end deep learning approaches or, if some form of background/foreground subtraction is desired, then deep learning based background subtraction (e.g. change_detection_pytorch) might be more desirable thanks to advances in AI accelerators for edge devices. Therefore, deploying neural networks is not an issue anymore. However, there are a couple of applications left for which some form of “classical background subtraction approach” is a viable choice. OpenCV’s background subtraction algorithms (CPU or CUDA) might be suitable choice, the BGSLibrary contains additional algorithms (CPU) that may be of use for such a (rare) deployment case.
Algorithm Parameter Tuning
Finding optimal settings to obtain usable results requires some realistic ground truth data which is utilized to find the most suitable algorithm with optimal settings. However, creating a binary mask as output from background/foreground estimation is one thing. Often it should result in some form of bounding box (e.g. for tracking and counting objects). The smaller the target object size is, the harder it is to fine tune as usually there is some remaining noise. However, that could be solved using neural networks instead (even on a binary mask resulting from bgs).
MOG, MOG2 and Frame Diff YouTube Video Comment
I was pointed at this video on YouTube comparing frame difference, MOG and MOG2 for background subtraction. As a computer vision veteran, this looked fishy too me. I found myself lucky that the source code was provided, so I dived into it.
Up front notice: The opencv documentation. Period. I don’t blame anyone for not spending endless hours of trying to figure out how certain algorithms are implemented and work ;)
What happened in this background subtraction comparison? First, the main observation here is that MOG and frame difference works quite well, but MOG2 looks extremely weird. How could this happen? Well, the source code implies that all classes are defined in deepgaze/motion_detection.py and are initialized with default values. The frame differencing is done using cv2.absdiff followed by threshold_image = cv2.threshold(delta_image, threshold, 255, cv2.THRESH_BINARY). The threshold is set to 25 and therefore we can assume that this value is somehow tuned/preselected manually.
MOG is initialized with history=10, numberMixtures=3, backgroundRatio=0.6, noise=20. This looks like a bit of manual work in terms of parameter tuning as well.
So what happened to MOG2? Well, it is initialized with self.BackgroundSubtractorMOG2 = cv2.BackgroundSubtractorMOG2(), or in other words it is not fine tuned and default opencv values are used. This means history=500, varThreshold=16, detectShadows=true. This should be the explanation why MOG2 looks so much different than MOG on this comparison.